Installation of a rigid 3 inch ABS
sewer connection with P-trap for our 5th wheel
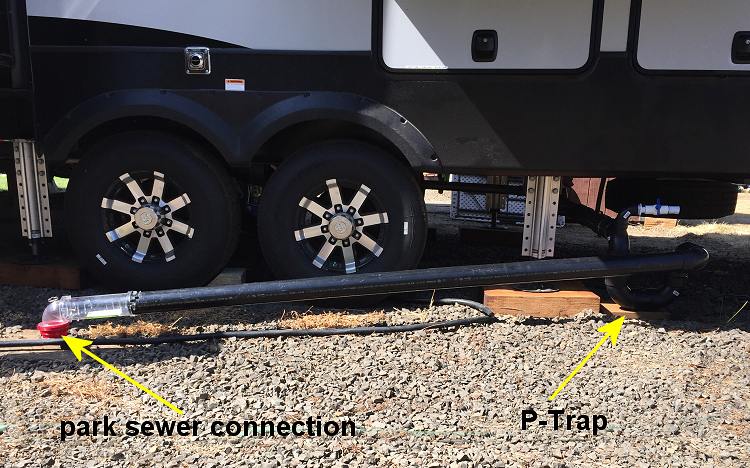
This is our new 2019 Keystone Avalanche 382FL 5th Wheel in its semi permanent location at Fern Ridge Shores RV Resort on the shores of beautiful Fern Ridge Reservoir just west of Eugene, Oregon, the best sailing lake in the Pacific Northwest. We're all about sailing in our retirement years and there's no better freshwater sailing in the west. Since we are here for the longer term, I wanted to set it up where we could leave the gray tank drain open so we can take nice long showers, and not have to worry about pulling the gray tank waste valve all the time. I have documented the whole installation below.
I designed a carefully engineered long term sewer hookup for our 5th wheel in its long term RV Park space. In order to avoid sewer gas coming back up the sewer connection hose into the coach (or out the tank vent on the roof), seasoned RV'ers know to leave the holding tank dump valves closed except when draining the tanks. Of course you ALWAYS leave the black tank closed until it's time to dump once it gets at least 2/3 full. Some folks like to leave the gray tank open for convenience when showering and so on, but this leaves the path open for putrid sewer gases to enter the coach. So I designed a special sewer connection out of black 3" ABS with a custom made P-trap vapor barrier like under the sinks at home so we can leave the gray tank drain open all the time.
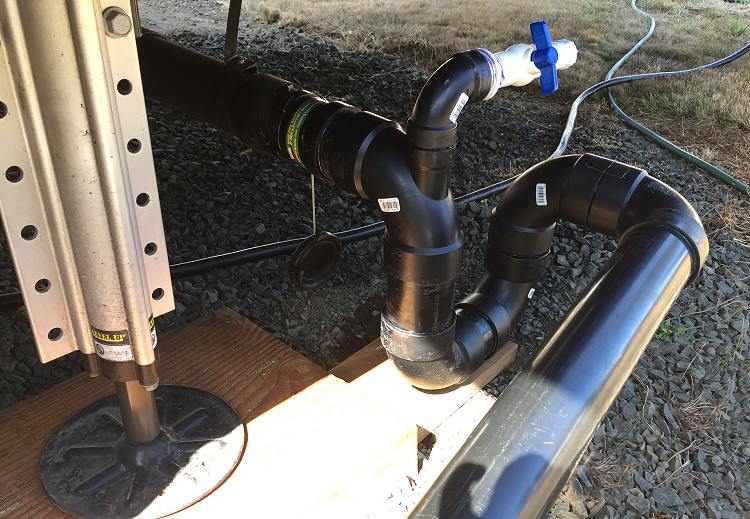
This is a closer look at the P-Trap where it connects to the RV sewer connection bayonet fitting. This is where one normal connects the standard flexible sewer hose. These are lightweight and convenient for travel, but not very durable for long term use. Some people will allow the hose to droop enroute to the sewer to create a sort of p-trap effect, but I decided I could do much better. Note I used a longer length of pipe for the down tube at the left than for the up tube at the left so the up tube sits lower than the down tube to ensure good flow up and out to the sewer. The P-trap connects to the RV's bayonet fitting with a special Valterra swivel adapter for rigid ABS sewer pipe.
I bought a 10' length of black 3" ABS pipe. I also purchased 5 black ABS 3" 90 degree fittings. With my Dewalt power miter saw, I cut short lengths of the pipe to join the elbows together using ABS cement to build a P-trap as pictured above. At the top of the P-trap I used the special elbow at the left which had a special 1 1/2" fitting to which I fitted a 3/4" reducer, a short length of 3/4" pvc pipe, a 3/4" shut off valve (blue handle), and 3/4" Slip x FHT PVC Garden Hose Fitting, which can be used to flush out the P-trap should it be needed.
This is the other end of the sewer pipe where it connects to the RV park's threaded sewer fitting in the ground. These are actually two fittings joined together as shown below.
I purchased these two fittings at Camping World to provide a nice clear connection at the ground so I can watch to see when the tank is finished emptying, and when flushing it out, that the water is flowing clear. To connect the long straight clear pipe to the black ABS pipe, I bought a short length of sewer hose and cut out the male bayonet swivel fitting. I used a special JB Weld Epoxy for Plastic to join this fitting to the pipe. Using swivel bayonet fittings at both ends of this structure makes it simple to lock it on or remove it.
My final addition will be a 3" ABS Backwater Valve to guard against any possibility backflow of waste from the RV Park sewer, if it should ever experience a catastrophic failure. Probably a one in a million chance, but better safe than sorry. Cheap insurance! I'll just glue it inline on the downflow tube.
So there you have it, a solid rigid sewer connection with a P-trap... easy to connect and easy to disconnect. With this connection we can comfortably leave the gray holding tank waste valve open most of the time and avoid the never ending unpleasant task of having to go outside the RV and go to the plumbing bay to dump the gray water. As mentioned at the top we will, of course, keep the black tank closed and only dump it when the monitors indicate above 2/3 full. As it starts to get full we can close the gray tank waste valve, add some tank cleaner, and let some gray water accumulate in order to flush out the pipes after dumping the black water.
Feel free to send us an e-mail with any questions you might have
Back to the homepage for The Windseeker Motor Coach